Caulk Like a Pro

Caulk is the finishing touch on many of your home projects and can make or break a great paint job. Its aesthetic purpose is filling gaps, but it also has practical functions: It seals out weather, dissuades small rodents, and provides a barrier to draft—especially around windows. Done well, you probably won’t know it’s there. Poorly applied, and you might create an unintended focal point of the unsightly variety.
Caulking isn’t difficult, but it is a skill to hone. Anyone can learn it with a little effort. Applying caulk requires a steady hand, a consistent speed, and a properly-cut tip. It also helps to have a quality gun with a sensitive trigger and a back-off lever to cut the flow when you have completed a line. Most of us have had an episode or two when the caulk snaked out of the gun, as if it had its own mind, strewing a mess about. Be sure of two things when you are setting the gun down: The release lever must be engaged, and you should set it on a cloth in case there is spillage.
What Type of Caulk to Use
The type of caulk you use depends on the application. For most interior jobs, you are going to want paintable caulk. An exception would be to a tub surround where, most likely, you are going to use white or try to match the color of either the tub or the tile. For bath caulking, a latex or silicone (or hybrid) caulk will work. Just make sure you use a really good caulk. Good-quality caulks will come with a generous warranty (such as 25-35 years). It’s unlikely you will get this kind of performance in a shower, but the better quality you buy, the less frequently you will need to recaulk.
Most silicone caulk isn’t paintable, but there are some newer hybrid latex/silicone caulks, such as some made by DAP that are. Do some research. Read some reviews. Alex caulk (especially the 35-year-warranty kind) is very good quality, but there are others. If you have vinyl siding, there are caulks available to match most colors. This is something you will likely need for window caulking.
Know also that there are clear and white or colored caulks. Clear caulks are idea for sealing finished wood or sealing two adjoining surfaces of different materials. Clear latex caulk is also paintable, so you could have one half of the beat clear, then paint the other side to match the wall or material. Read the labels completely or talk to a salesperson when you choose your caulk type. Many clear caulks are non-paintable silicone, which would be used for specific purposes. Some caulks are interior, and some are exterior grade (or both). Also, some caulks have a heat rating, which will be relevant if you are caulking around ductwork. And all caulks adhere to specific materials. Just make sure the caulk you use is intended for your particular application. There are always new products appearing on the market. You can even get concrete caulks now for fixing smaller cracks in driveways, walks or basement walls.
For outdoor or indoor use, urethane caulks are some of the most durable made. The downside is that they are extremely difficult to smooth, making them better for using near roofs or locations that won’t be subjected to close inspection. They can be used indoor too. The grace of them is that they will outlast most latex caulks on the market. Smoothing should be done with a latex glove and mineral spirits.
For concrete work, there are effective urethane “caulks” that are self-leveling. These are intended for horizontal applications only (and won’t be effective on vertical cracks or seams).
Caulk and Painter’s Tape
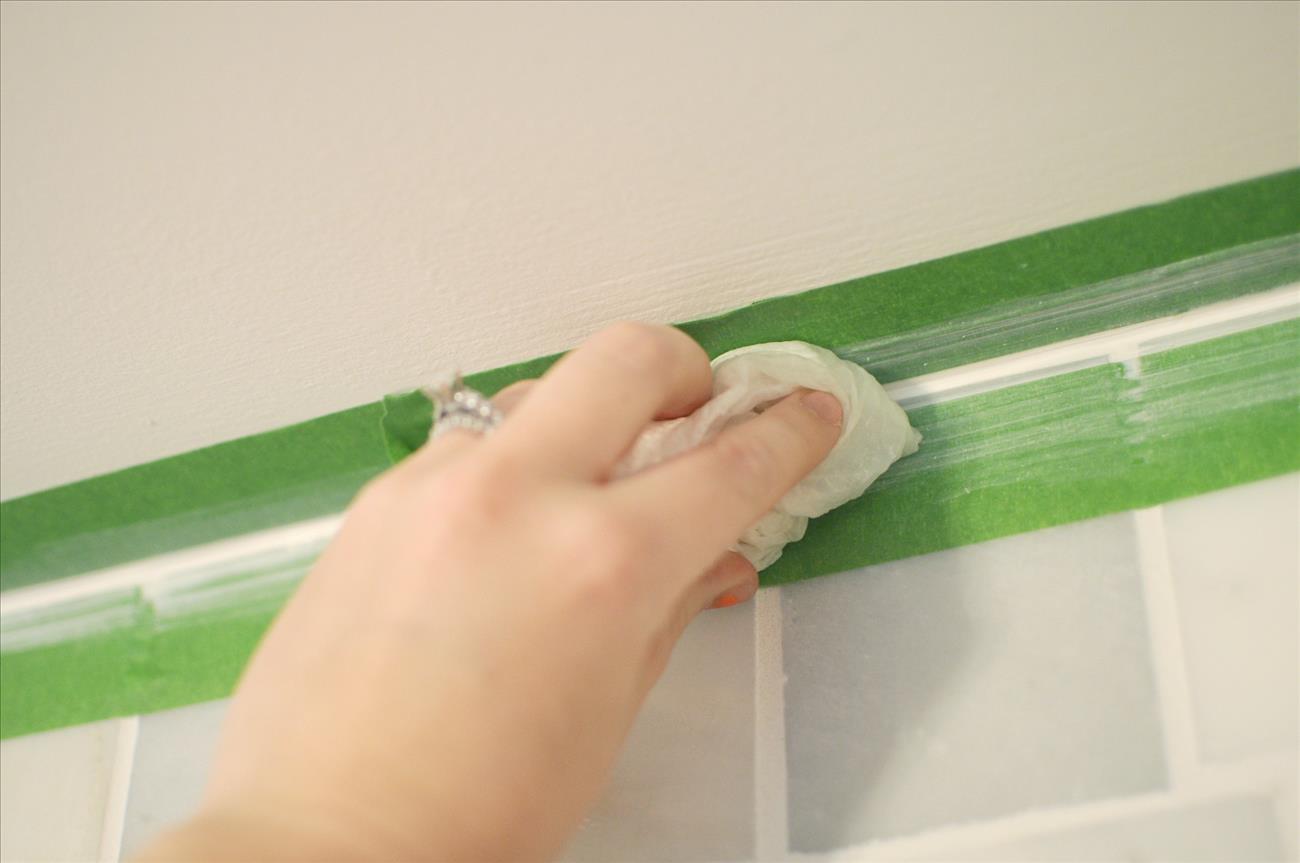
Here’s a little secret about caulking: You don’t have to freehand it. Yes, you can use painter’s tape for precise lines. And no one will judge you or accuse you of cheating. Painter’s tape is especially helpful when you are caulking between two different colors or two different surfaces. Example: A wood cabinet with an adjoining painted wall.
If you are painting walls and trim the same color, there is less need for painter’s tape. You can apply it with a gun, smooth it with your finger, and let it dry a day before painting. If you are painting walls with contrasting trim and want a sharp, clean edge, it’s time to get your tape out. Blue painter’s tape works for this, but if you’re taping over a freshly painted edge, FrogTape is less adhesive and might work better as it has a smaller likelihood of damaging your paint. Apply the tape to the trim about 1/16-inch in or so for a good clean line. Here’s the big secret that most DIY enthusiasts don’t know: If you use latex caulk, you can apply your latex paint immediately when the caulk is fresh. This should, in fact be done immediately, as a semi-dried caulk WILL cause problems when you drag the brush through it. Be sure to load the brush with paint or you will end up with streaks from the mismatched color. Follow up the brush work with a roller, if rolling walls (to smooth out the brush strokes. Avoid rolling into the joint, however, as it will damage your caulk job. The greater the contrast in color between the paint and caulk, the more care you must take to eliminate streaking.
Cut your caulk tube with a sharp utility knife at around a 30-degree angle. Don’t make the cut too far up the nozzle, as it will dispense a really large bead. That said, if you need a larger bead for large gaps, you will want to cut more off. Start off high near the tip the nozzle as you can always cut off more but can’t replace the tip if you make the dispensing hole too large.
You should caulk with the cut off angle along your draw stroke. Caulk is best applied using a fairly quick stroke. It is common for homeowners to go too slow when caulking, which may show up as stops and starts and uneven application. The key is to coordinate your trigger pull with a steady speed of application. This is the part that just takes experience, but it does help to watch a pro do it. You can find videos on YouTube.
Immediately after applying it, you can smooth it with a damp finger, making sure you frequently wipe the joint (also in even strokes) so you don’t run strands of the old caulk into your caulk line. If the caulk gets stringy and starts pilling and lifting, it’s drying too fast or you’re waiting too long to smooth it, and you should do shorter sections.
If you are painting into the fresh caulk, you want to complete small sections, then immediately apply the paint. Use a loaded brush and paint straight up along the tape. If you fuss and jam the bristles into the tape edge, it’s likely to bleed under tape and ruin your caulk job and your neat line. Just make a bold, confident stroke. You can do it.
After painting the section, immediately and carefully pull away the tape. Most problems people have with taping paint or caulk edges have to do with either letting the paint dry too much or pulling the tape into the paint. To repeat: always remove tape while the paint and/or caulk is still wet. This is how you get a clean, sharp line.
Caulking Large Gaps
Most caulk will do fine with ¼-inch gaps. When bigger areas need filling, you may need to run two contiguous beads or do two separate applications with drying between them. For large gaps, you can use a foam backer rod, which you jamb into the crevice before caulking. Know that caulk does shrink, so plan your job accordingly when tackling large gaps. You may need to repeat the process, either when it dries, or later, up the road. Stuffing backer rod in large gaps may be the only way to get a consistent bead, as the caulk tends to sink into the recess. Establishing the contiguous surface, provided by the rod, also improves the overall strength of the caulked “joint.”
Where to Caulk
Caulk around windows to seal gaps between wood or drywall and the windows (or around quarter round or another window trim). Caulk in bathtubs where the tile meets the edge of the tub. This is important. You do not want grout on that adjoining angle for two reasons: One being that, as the tub fills or the floor expands, grout will quickly crack and allow moisture in. The other is that this ledge is prone to holding water, and mold and mildew is the result. While caulk can also get moldy, when grout is used in this gap, it becomes inevitable. If you are having your bathroom tiled (or your sinks), the proper way to do it is to leave an expansion gap at the seam and fill it with caulk.
Remove old caulk before applying your new caulk. Why? If there is mildew in the existing caulk, it will migrate both into your new caulk and behind the old caulk, eventually spreading to green board and other structural materials, which becomes a serious and expensive fix. You can remove caulk mechanically by using a knife or other proprietary tool. Just make sure it doesn’t scratch the finish of the tub or the tile. There are commercially-made, liquid caulk removers that can expedite the job, including an effective product made by Goo Gone. Pour it on and let it sit for a bit, then use a small pen knife or removal tool to get it out. Follow up with bleach and a rag to clean out any mildew and let it dry overnight before reapplying caulk.
For a neat caulk job, employ the taping skills you learned above, only carefully apply the tape about ¼-inch from the seam of the adjoining surfaces. Rub the tape down firmly so that it’s flat, then run your bead along each edge, quickly smoothing it with a damp finger. Before the caulk is dry, pull up the tape using a smooth motion. If you botched any portion of the caulk line, you can try adding a bit of caulk immediately, or wait and touch it up the following day (recommended). For toilet bases, follow the same procedure. Nighttime is a good time to caulk, as it can be left to dry overnight and will be ready for use the next day.
Other places to caulk are screw holes—especially ones you might need to remove later. Also, use caulks in gaps where cold air might enter your home, including holes where pipes exit outside walls, for instance, can let draft in. Check out our winterizing article for more weatherizing tips.
Cleaning Up Caulk
If you stick with latex caulk, you can clean up easily with soap and water. Silicone and urethane caulks require a solvent, however, and you will need to check the packaging for proper solvents. Do know that latex caulks are generally easier to work with and clean up better. The urethane outdoor caulks have better longevity. That said, they tend to be really difficult to smooth and require really good technique for a finished appearance. Both urethanes and silicones require solvents (such as mineral spirits) for smoothing and cleanup.
Other Caulking Tips
While some caulk will stick to bare wood, pre-priming and/or painting the wood will greatly improve the adhesion. Check with the manufacturer for more details for your application. Some materials billed as caulks are actually super adhesive and can be used as glue or as wood fillers, and there are always new products coming out. If you have a lot of caulking to do or are using really high-viscosity material, you might consider a battery-powered caulk gun, such as the Ryobi. It relieves some of the hand fatigue caused by the trigger. Campbell Hausfeld makes a pneumatic caulk gun that is marketed for commercial use, but if you have a really large project and/or are a tool junkie, either of these might be good choices for you. For the average user, a good-quality mechanical caulk gun with a trigger that suits your hand size should be sufficient.
Any hardware or paint store manager should be able to recommend products for your application, and, of course, the internet has a wealth of information. If, after reading this article, you are not quite up to the DIY task or don’t want to invest in the equipment, consider hiring a handyman or professional painter to complete your tasks.
Are You a Professional?
Requests for your services are coming in left and right. Let’s connect and grow your business, together.

